Whipped Fruit Verrine - Easy Layered Dessert
Craving a light, refreshing dessert? This Whipped Fruit Verrine - Easy Layered Dessert will delight your taste buds with layers of creamy goodness and vibrant fruits!

- A Sweet Adventure with Whipped Fruit Verrine - Easy Layered Dessert
- Essential Ingredients Guide: Whipped Fruit Verrine - Easy Layered Dessert
- Mastering the Art of Professional Cooking: Essential Steps and Techniques
- Pro Tips & Secrets to Perfect Your Whipped Fruit Verrine
- Perfect Presentation for Your Verrine
- Storage & Make-Ahead: Keep it Fresh!
- Creative Variations to Shake Things Up
- Complete Nutrition Guide: Sweet, But Smart
- Expert FAQ Solutions: Let’s Troubleshoot!
- Wrap-Up: Your Sweet Flavor Adventure Awaits!
- Recipe Card
A Sweet Adventure with Whipped Fruit Verrine - Easy Layered Dessert
Oh my gosh, have you ever had one of those days when the sun’s shining, you’re feeling great, and you’re just craving something sweet, light, and super delicious? i’ve been there! one sunny afternoon, i decided to whip up a whipped fruit verrine - easy layered dessert and it was seriously one of the best decisions ever.
Imagine creamy layers of whipped goodness, vibrant fruits, and a little crunch all in a cute glass! yep, it's as dreamy as it sounds.
A Little History Behind the Layers
These layered dessert recipes have their roots in the elegant french tradition. verrines, those cute little glasses, are perfect for showing off layers of delightful flavors.
It’s like giving a little shoutout to france while digging into something light and fun! nowadays, they’re everywhere—from posh dinner parties to backyard bbqs.
Seriously, everyone seems to love them. you can whip one up in just 45 minutes , and trust me, it’s a super easy dessert idea that seems fancy but is as simple as pie .
Cost and Time: What's the Damage?
You only need the most basic ingredients to create this beauty, so you're not breaking the bank here. just a few cups of fruit, some cream or yogurt, and maybe a little granola.
It yields about 4 servings , so it's perfect for intimate gatherings or a special family dessert night. and did i mention it’s a no-bake dessert ? so you can stay cool as a cucumber while the sunshine warms up your day.
The Benefits of This Dessert Dream
Why should you try your hand at this fruity cream recipe ? first off, it’s packed with goodness. you can customize your layers with whatever seasonal fruits tickle your fancy, making it a great option for any time of year.
Plus, it’s a healthier alternative to heavier cake recipes or sugary treats. it’s perfect for summer—cool, refreshing, and also, hello, kid-friendly desserts ? your kids will love it just as much as you will!
It can also be a show-stopper for parties. you know, that dessert that everyone takes pictures of before they devour? it's visually striking with those show-stopping layers and easy to prep, meaning you’ll look like a culinary genius without all that stress.
Pair it with some fresh mint, and you’ve got an elegant dessert presentation that will wow your guests.
Let’s Get to the Good Stuff: Ingredients Coming Up!
I can’t wait to share the ingredients list! here’s what you’ll need to get started on your own whipped fruit verrine - easy layered dessert .
You’ll quickly see just how simple it is to create this light and airy dessert at home. ready? grab your bowls, and let’s layer up some sweet goodness!
Essential Ingredients Guide: Whipped Fruit Verrine - Easy Layered Dessert
Creating a delightful dessert isn’t just about following a recipe; it’s about having the essentials that make everything pop! so let’s break down what you’ll need to whip up this whipped fruit verrine - easy layered dessert .
Trust me, once you have the basics down, you'll be the hit of any gathering with your show-stopping dessert layers .
Premium Core Components
Let’s start with the premium core components of our verrine. For this recipe, you’ll want:
- Heavy whipping cream or Greek yogurt —1 cup (240 ml)
- Powdered sugar —2 tablespoons (25 g) (or more, if you love it sweet)
- Vanilla extract —1 teaspoon, because, let’s be honest, vanilla makes everything better!
Oh, and don’t forget the fruits! You’ll need mixed fresh fruit —2 cups (300 g), like strawberries, kiwi, or whatever’s looking good at the store. Make sure those babies are ripe!
Quality Indicators and Freshness Tips
To ensure freshness, look for fruits that are bright, firm, and fragrant. if the berries look mushy, pass on them.
And when it comes to the cream? choose one that’s within its best-by date . you want to pick up a carton where the cream is thick and luscious, not watery.
Lastly, store your unused ingredients properly. Keep cream in the fridge at 40° F ( 4° C) or colder. Fresh fruit should also go in the fridge but check if it needs to breathe—storing strawberries in a closed container can make them go bad faster!
Signature Seasoning Blend
No dessert is complete without a signature seasoning! for our verrines, we’re keeping it simple, but feel free to get creative.
Adding a hint of cinnamon or nutmeg to the whipped layer can elevate it, taking your layered dessert recipes to the next level.
Herbs like mint pair beautifully with fruit and can be used for an extra pop of flavor. just a leaf or two on top can elevate your dessert into something instagram-worthy.
Honestly, it makes for an great entertaining dessert idea !
Smart Substitutions
Let’s talk substitutions, because we all know life doesn’t always go as planned. if you’re out of heavy whipping cream, coconut cream works like a charm and gives you that nice, creamy texture.
Vegan friends? use dairy-free yogurt —easy peasy!
What if you don’t have honey or maple syrup? Simple! Just skip it or use a little sugar instead. Feel free to swap in seasonal fruit options based on what’s available; peaches or blueberries sound divine, don’t you think?
Kitchen Equipment Essentials
For this recipe, you don’t need a ton of fancy equipment. Here’s a quick rundown of must-have tools :
- Mixing bowls (preferably one that can hold a little heat)
- Electric mixer or whisk —I swear, a good whisk workout can be invigorating, but electric ones are just faster!
- Measuring cups and spoons —because precision is key in baking.
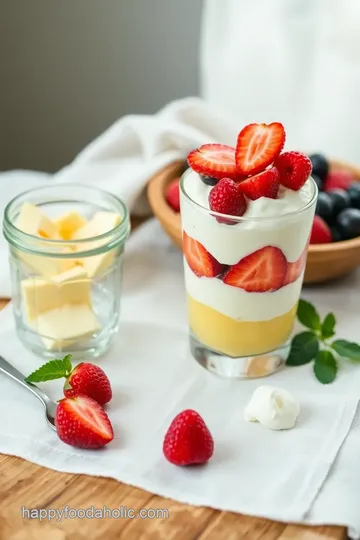
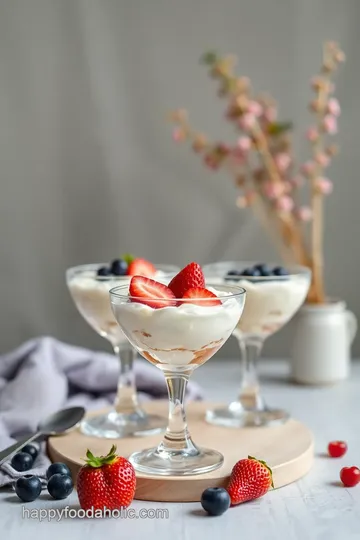
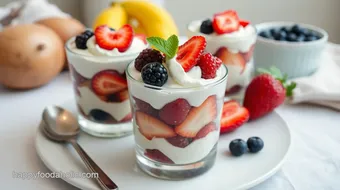
- Small glasses or dessert cups —presentation is everything!
Just a tip: If you're feeling fancy, serve your verrines in mason jars! They’re cute, portable, and remind you of summer picnics.
Fun with Creative Components
You can also toss in some crunchy dessert toppings like granola or crushed cookies. mixing textures with granola not only makes your dessert light and airy but also really fun to eat.
Who doesn’t love that satisfying crunch?
Alright, now that we’ve got all the essentials covered, are you ready to layer it up? Get excited to craft your own Whipped Fruit Verrine using those tips and tricks! Let’s move on to the fun part—putting it all together and serving this beauty up to family and friends!
Mastering the Art of Professional Cooking: Essential Steps and Techniques
Cooking like a pro doesn’t have to mean endless hours spent in the kitchen. it’s all about understanding some essential techniques that will enhance your skills and help you whip up dishes with confidence.
Today, let's dive into ways to streamline your cooking process, especially when preparing whipped fruit verrine - easy layered dessert .
Trust me, mastering these steps can transform your cooking experience, and yes, that includes making those stunning layered dessert recipes !
Essential Preparation Steps
First up, let’s talk mise en place . it's a fancy french term, but all it means is having everything in its place before you start cooking.
So, for our verrine, chop up your fruit, measure out your cream, and have your sugar ready to roll. it’s like the calm before the storm.
.. or the perfect dessert prep!
Next, time management is key. when i've tried to multitask, i ended up with burnt cream or soggy fruit. stick to a plan! for the verrine, you can prep the whipped layer and let it chill while you chop your fruit.
It'll save you some hassle!
Organizing your workspace helps too. keep ingredients separate and within arm's reach. i’ve dropped a bag of flour more times than i can count because it was too far away! lastly, don’t forget kitchen safety.
A sharp knife can be your best friend but also a reason to call for help, so slice carefully and keep your area tidy.
Step-by-Step Process
Let’s break down the Whipped Fruit Verrine . Here’s how to nail it.
-
Prepare the whipped layer : start by mixing 1 cup of heavy whipping cream or greek yogurt with 2 tablespoons of powdered sugar and 1 teaspoon of vanilla extract .
Whip it until soft peaks form (around 2- 3 minutes ) if you’re using cream.
-
Fruit Layer : Chop up 2 cups of seasonal fruit . You’ll want them in bite-sized pieces. If you want it sweeter, drizzle with 1 tablespoon of honey or maple syrup .
-
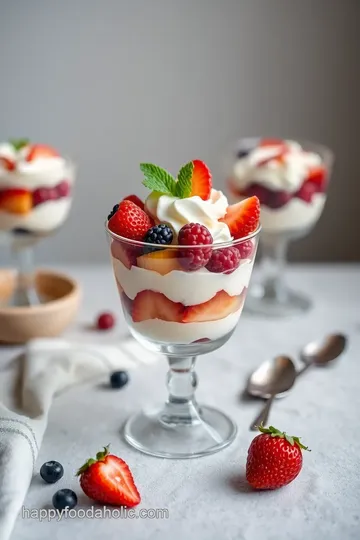
Assemble your masterpiece : layer your crunchy goodness at the bottom. i usually go for about ½ cup of granola or crushed cookies .
Top that with your whipped layer, followed by the fruit. repeat until your glasses are full!
-
Chill Out : Refrigerate for at least 30 minutes . Trust me, this step is where the magic happens.
Expert Techniques
Now, let’s chat about some pro tips . for me, the biggest revelation was learning about temperature control . if your cream is too warm, it won’t whip properly, and we don’t want a sad, flat dessert.
Aim for your ingredients to be cold!
Timing is equally important. while the chilling time is passive, you need to be aware. too long and your dessert might get watery.
Keep an eye on it, using those visual cues —the fruit should look vibrant and juicy when ready to serve.
Success Strategies
Just like in life, cooking has its pitfalls. common mistakes? overwhipping the cream is a big one—if it turns grainy, it’s too late! stick to light and airy.
If you want to make it ahead of time, you can layer it in jars and seal them up for a couple of hours before serving.
Quality assurance? taste frequently! and don’t be shy about adjusting sweetness or texture. your taste buds are the best judges.
Additionally, consider options for dietary needs. vegan whipped cream or gluten-free granola can easily make this dessert friendly for everyone.
If you're entertaining, think about how you’ll plate this beauty. A sophisticated verrine in a small cup looks way more gourmet than it actually is to make.
Conclusion
Embracing these professional cooking methods can elevate your culinary game, especially when you’re creating fun desserts like this whipped fruit verrine .
With easy layered dessert recipes at your fingertips, your friends will be begging for your secret. whether you’re at a summer barbecue or a cozy family dinner, these tips will make you look like a kitchen rockstar!
And there you have it! before we move on, remember that cooking should be fun. get in there, experiment, and maybe even create your own whipped fruit combinations .
Who knows? your next dessert could be the star of the show. ready for some additional information ? let’s keep the culinary adventure rolling!
Pro Tips & Secrets to Perfect Your Whipped Fruit Verrine
Oh my gosh, let’s dive into some insider tips that’ll make your whipped fruit verrine - easy layered dessert a total showstopper! this dessert isn't just a feast for the taste buds but also for the eyes.
To kick things off, here’s a little secret: always chill your mixing bowl and beaters before whipping the cream. trust me, this helps achieve maximum volume and that dreamy texture we all crave.
Ain’t nobody got time for flat whipped cream!
Now, for those time-crunched folks (we've all been there, right?), you can prep your verrines a few hours ahead. this not only saves you time but also lets all those yummy flavors meld together beautifully.
For a flavor twist, don’t shy away from mixing in spices or flavor extracts like almond or even a splash of orange zest.
It’s a game changer!
Perfect Presentation for Your Verrine
When it comes to plating techniques , the devil is in the details! use clear glasses or small jars to show off those gorgeous layers.
Start with crunchy granola or cookie crumbs at the bottom to give it a base that’s as supportive as a best friend.
Make sure to rsvp to the color party by choosing a rainbow of fruits. mix those vibrant strawberries with tropical mango and electric blueberries for an eye-popping look!
Think of it as your canvas, so sprinkle a bit of mint leaves or a dusting of powdered sugar on top for that final touch.
It’s those garnishing techniques that make your dessert look like it’s ready for a fancy magazine shoot!
Storage & Make-Ahead: Keep it Fresh!
So, you have some leftovers – or maybe you just made a bunch for sunday funday. no worries! store your assembled verrines covered in the fridge for up to two days .
Just a heads up: the granola may lose its crunch if it's all layered up in there. if you’re planning to enjoy it later, keep the crunchy layer separate until just before serving .
It's a simple tip that ensures you savor that fresh, crunchy delight!
Creative Variations to Shake Things Up
One of the best parts about the whipped fruit verrine is its versatility! wanna make it vegan? swap in some dairy-free yogurt and a plant-based cream.
Feeling adventurous? why not infuse the cream with spices like cardamom or cinnamon for a cozy autumn twist? or switch it up with seasonal fruits —think peaches in july and pumpkin in october!
And for those who love a bit of crunch, toss in some toasted nuts or seeds . They add nutrition and texture—totally worth the extra step!
Complete Nutrition Guide: Sweet, But Smart
Eating desserts doesn’t have to mean sacrificing health. this whipped fruit verrine is packed with nutritious ingredients . you’ve got your fresh fruits for fiber and vitamins, and if you go with greek yogurt, you'll rack up the protein too! a quick breakdown: each serving gives you about 250 calories , so it fits nicely into your dessert plans without wrecking your healthy vibe.
Expert FAQ Solutions: Let’s Troubleshoot!
You might have some burning questions, right? “why did my whipped cream not whip?” well, my friend, it could be as simple as the cream being too warm.
Remember: cold is your bestie here! another common problem? not enough flavor. if you're feeling meh about the taste, pump it up with a bit more vanilla or even a splash of fruit juice—just a little zest can go a long way!
Don’t forget, creating layered desserts like this can be a bit messy but don't sweat it! That’s part of the fun. Embrace those imperfect layers—they tell a story!
Wrap-Up: Your Sweet Flavor Adventure Awaits!
At the end of the day, making this whipped fruit verrine - easy layered dessert is all about having fun and getting creative! gather your favorite fruits, grab your fam or friends, and start layering those flavors.
Remember, it’s not just a dessert; it’s a joyful experience! so whether you're prepping for a summer party or just treating yourself on a tuesday, this dish has got your back.
Get ready to impress, and enjoy every delightful bite!
Whipped Fruit Verrine - Easy Layered Dessert Card
⚖️ Ingredients:
- 1 cup (240 ml) heavy whipping cream or Greek yogurt
- 2 tablespoons (25 g) powdered sugar (or to taste)
- 1 teaspoon vanilla extract
- 2 cups (300 g) mixed fresh fruit, chopped (e.g., strawberries, blueberries, kiwi, mango)
- 1 tablespoon (15 ml) honey or maple syrup (optional)
- ½ cup (60 g) granola or crushed cookies (e.g., digestive biscuits or graham crackers)
🥄 Instructions:
- Step 1: In a mixing bowl, combine heavy cream or Greek yogurt, powdered sugar, and vanilla extract.
- Step 2: Whip using an electric mixer on medium speed until soft peaks form (if using cream) or until smooth and creamy (if using yogurt).
- Step 3: Chop the mixed fresh fruit into bite-sized pieces.
- Step 4: If desired, drizzle with honey or maple syrup, and gently toss to combine.
- Step 5: Start by placing a layer of the crunchy granola or cookie crumbs at the bottom of each glass.
- Step 6: Spoon a layer of the whipped mixture over the crumbs, smoothing the top.
- Step 7: Add a layer of the prepared fruit on top of the whipped mixture.
- Step 8: Repeat the layering process until all ingredients are used, finishing with a fruit layer on top.
- Step 9: Refrigerate the assembled verrines for at least 30 minutes to allow flavors to meld.
- Step 10: Serve chilled, optionally garnishing with a mint leaf or a sprinkle of additional crumbs.
Previous Recipe: How to Cook Ground Lamb in 30-Minutes Deliciously: My Savory Skillet
Next Recipe: How to Cook Chicken Kashmiri: Creamy & Flavorful Delight at Home!