Crispy Dosa: Authentic Indian Rice Pancakes
Want to enjoy crispy dosa at home? Let me share my grandmother's secret for perfect dosas that are bursting with flavor! Try this authentic recipe today!

- Essential Ingredients Guide for Dosa Lovers
- Mastering the Art of Cooking Dosa: Delicious Indian Rice Pancakes
- Pro Tips & Secrets for Making Dosas
- Perfect Presentation: Serve with Style
- Storage & Make-Ahead Tips
- Creative Variations
- Complete Nutrition Guide
- Wrapping it Up
- Frequently Asked Questions
- Recipe Card
Have you ever had that moment when a delicious scent wafts from the kitchen, and you just can’t help but rush over? that was me one sunday morning, back when my best friend introduced me to dosa .
I stood there, watching the thin, golden pancakes crisp up in the skillet. it’s one of those memories that makes your mouth water just thinking about it.
Today, i’m here to share how to cook dosa: delicious indian rice pancakes and bring a little slice of south indian cuisine to your home!
Dosa is not just a dish; it's a piece of culture, a staple in many indian households that’s so much more than a simple breakfast.
It’s a fermented batter of rice and lentils that transforms into a crispy pancake, and trust me, it’s life-changing. but more on that in just a minute!
Recipe Overview
The origins of dosa go way back, with roots in south india. known for its versatility and crispiness, it's a popular option for both breakfast and street food.
It's made with dosa ingredients that are easily accessible, and it’s an easy dosa recipe anyone can try! you’ll need to set aside some time—about eight hours to soak the grains and then around ten minutes to cook each batch.
But don’t worry; this dish is well worth it!
Depending on how you serve it, dosa can fit almost any budget. honestly, the most expensive part is probably the sambar you'll pair it with.
Plus, you can yield about 10-12 dosas from one batch, which is enough to share with friends or have some tasty leftovers!
Key Benefits
Now let’s talk about the perks of making dosa. first off, it’s super healthy ! dosa is a great source of carbohydrates and protein, thanks to the lentils.
This rice and lentil dish is also naturally gluten-free, making it perfect for those looking for gluten-free indian recipes.
What’s even cooler is that dosas can take on many forms! you can whip up a classic plain dosa or explore dosa variations like masala dosa, filled with spicy potatoes, or even a veggie-loaded version.
They’re perfect for special occasions, casual hangouts, or simply satisfying those late-night cravings!
Dosa stands out from similar recipes because of its unique texture. that crispiness paired with a soft, airy center is just heavenly.
Plus, they’re super easy to make right at home with just a bit of practice and a few cooking tips for dosa.
So, what do you say? Are you ready to dig into the delicious world of dosa? Let’s check out what you’ll need!
Transition to Ingredients Section
If you’re itching to jump into the kitchen now, let me break down the dosa ingredients and get you started on this yummy adventure! we’ll cover everything you need, plus some tips and tricks to make sure your first batch turns out just right.
Trust me, once you taste a homemade dosa with the right chutneys for dosa , you won’t want to go back to store-bought!
Essential Ingredients Guide for Dosa Lovers
Let’s talk about something near and dear to my heart: making dosa . if you’ve ever had these savory rice pancakes from a south indian restaurant, you know that they’re not just any breakfast.
They're the stars of indian breakfast recipes . so, grab your apron, because we’re diving into the essential ingredients you need to create the perfect crispy pancake recipe right at home.
Premium Core Components
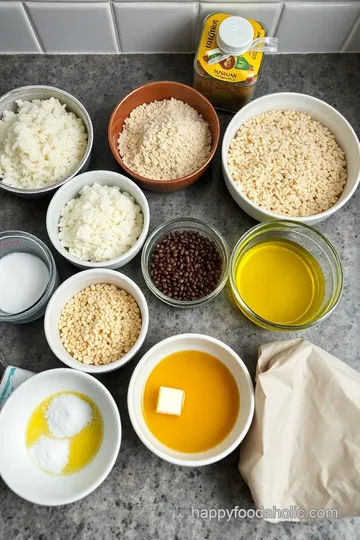
First things first, let’s get down with the core ingredients for your dosa batter. The dosa ingredients are simple, yet vital.
- 1 cup (200g) white rice : Honestly, go for long-grain if you can. It really makes a difference in texture.
- ¼ cup (50g) split urad dal : If you can get your hands on this black gram lentil, don’t skip it! It gives your dosa that lovely fluff.
- ½ teaspoon fenugreek seeds : Totally optional, but it adds a nice depth of flavor.
- 1½ cups (360ml) water : For soaking—don’t forget this step!
When it comes to quality indicators , make sure you’re opting for fresh rice and beans. if they’ve been sitting in your pantry for ages, it’s time to toss them.
As for storage , keep your ingredients in a cool, dry place. the shelf life varies, but generally, dried lentils and grains can last for quite a few months.
Just remember to check that they’re not stale!
Signature Seasoning Blend
Now let’s jazz things up with some flavor enhancers and aromatics . After all, you want that dosa to pack a punch, right?
- Essential spice combinations : For a basic dosa, you won't need much besides salt. But do consider adding some black pepper or chili powder for that little kick.
- Herb selections : Fresh cilantro is my go-to for garnishing once your dosa is plated. It’s a game changer!
- Regional variations : If you want to get fancy, you can use ingredients like curry leaves or ginger, depending on what part of India you’re channeling.
Smart Substitutions
What if you find yourself missing a key ingredient? Don’t sweat it! Here are some common alternatives :
- Don’t have urad dal? Split chickpeas (or chana dal) work in a pinch. You'll still get that cuddly texture!
- Vegan? Substitute ghee with vegetable oil—easy peasy.
- Seasonal options: Feel free to mix in some grated zucchini or carrot if you want to sneak in some veggies.
Kitchen Equipment Essentials
You don’t need a fancy kitchen to make these babies. Here are the must-have tools for dosa-making:
- Blender or wet grinder : This is key to getting that smooth batter. Trust me, the texture is everything!
- Skillet or non-stick pan : A well-seasoned cast iron works wonders if you’re up for the challenge.
And here’s a prep tip : Preheat that skillet before pouring your batter! You want to hear that satisfying sizzle.
Closing Thoughts
In a nutshell, understanding your dosa ingredients and their roles is your secret weapon for mastering this iconic dish. whether you're whipping up an easy dosa recipe for breakfast or impressing guests with a traditional dosa preparation for a special occasion, these tips will help you along the way.
Next up, we’ll dive into the step-by-step instructions on how to make dosa , including some quick cooking tips! trust me, you’ll be serving up crispy dosa like a pro in no time.
Ready? let’s get cooking!
Mastering the Art of Cooking Dosa: Delicious Indian Rice Pancakes
When it comes to south indian cuisine , nothing beats the crunchy, savory goodness of a well-made dosa. honestly, once you learn how to make dosa , it opens up a world of flavors that will have you hooked! these savory rice pancakes don’t just require some basic ingredients; they’re a celebration of culture and tradition.
Plus, they’re easy to whip up, even for a beginner. let’s dive into the professional cooking methods that’ll help you create crispy dosa like a pro.
Essential Preparation Steps
First things first, we gotta talk about mise en place . it’s a fancy term, but it just means having everything ready before you start cooking.
So, grab all your dosa ingredients : rice, urad dal, and fenugreek. soak them in water for at least 8 hours or overnight.
Trust me, that fermentation makes all the difference!
Next, time management is key. you don’t want to find yourself rushing at the last minute, right? plan your cooking around when you’ll serve the dosas.
A great tip is to mix your batter and let it ferment for 6- 8 hours while you do something fun—like binge-watching a show or catching up with friends!
Organization will save your sanity, too. clean as you go, and keep your workstation neat. it’s so much less stressful! and don’t forget about safety: hot pans and oil are involved.
Keep a cool head and watch your fingers while flipping those dosas!
Step-by-Step Process
Now, let’s break it down step-by-step:
-
Soak the Grains: Combine 1 cup of white rice, ¼ cup urad dal, and ½ tsp fenugreek in a bowl. Add enough water to cover them and let them soak.
-
Blend the Batter: Once they’re nice and puffy, drain and blend until smooth. Add water gradually; this makes for a fluffier batter. Let it ferment until bubbly—around 6- 8 hours .
-
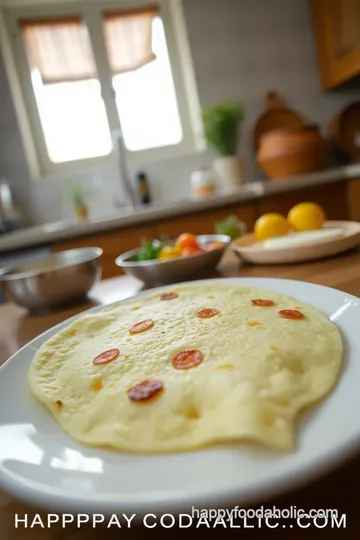
Cook the Dosa: Heat a skillet over medium heat (about 350° F is perfect). Pour a ladleful of batter and spread it thin. Drizzle a bit of oil around the edges.
-
Monitor the Temperature: Watch closely! Cook until the edges are golden—this should take about 2- 3 minutes .
-
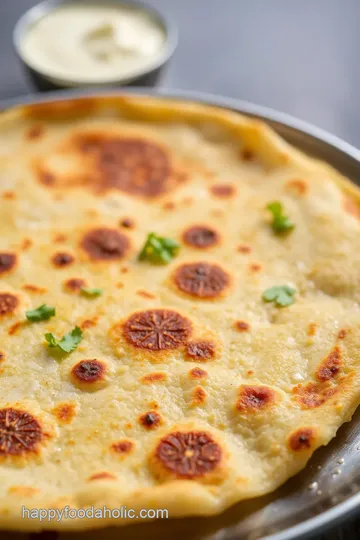
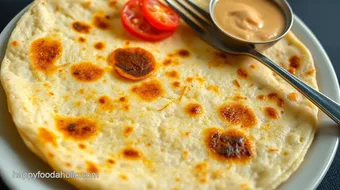
Flip and Serve: Gently flip the dosa for an extra minute if you like it crispier. Serve hot with your favorite chutneys for dosa —you can't go wrong with coconut or tomato chutney!
Expert Techniques
Once you've got the basics down, try these pro tips:
- Quality Checkpoints: Check that your batter is slightly bubbly before cooking. This means it’s fermented just right!
- Troubleshooting Tips: If your dosas aren't crisping, your pan might not be hot enough. Crank that heat a bit!
- Flavor Enhancements: Spice things up by adding chopped green chilies or cilantro to the batter before cooking.
Success Strategies
Now, let’s chat about common pitfalls. One mistake many newbies make is skimping on the soaking time. Remember, good fermentation is vital for that delicious tang!
Quality assurance is easy—taste the batter before cooking, and adjust the salt if needed. if you don’t plan to cook all your batter, you can store leftovers in the fridge for a week.
Just give it a good stir before using.
For special occasions, consider dosa variations like stuffed masala dosa, filled with spiced potatoes or even a street-food version with a spicy filling for a fun twist!
Wrapping it Up
Cooking dosa is more than just another dish; it’s a gateway to authentic indian flavors that can be shared with friends and family.
Whether you’re whipping up a simple breakfast or impressing guests, knowing how to cook dosas can turn an average meal into an exciting feast!
So, next time you're wondering about a delightful dish to prepare, remember these steps, techniques, and some cooking tips for dosa to ensure success.
Now that you’re all set to try your hand at these fabulous rice pancakes , stay tuned for the next section where i'll share even more additional information to elevate your dosa game!
Pro Tips & Secrets for Making Dosas
Alright, let’s dive into some pro tips and secrets for that perfect dosa experience! these little nuggets of wisdom will save you time and boost those flavors that make your crispy pancake recipe so special.
Chef's Insights
First off, the fermentation process is a game-changer. it might seem intimidating, but trust me , it’s the ticket to achieving that lovely tangy flavor in your dosa batter.
You want to leave it in a warm spot overnight. if you live in a cooler area, try placing it in your oven with just the light on.
It's like a cozy blanket for your batter!
Time-Saving Techniques
Need dosas in a pinch? soak your dosa ingredients ahead of time! you can soak the rice and lentils in the morning and blend them in the evening.
It's a great way to fit cooking into a busy day. plus, who doesn’t love a quick and easy dosa recipe?
Flavor Enhancements
Let’s talk toppings. seriously, don’t skimp on your chutneys for dosa . coconut chutney is classic, but a zesty tomato chutney can really elevate your dish.
Consider adding a sprinkle of cumin or chili powder right onto the batter as it cooks for an extra kick!
Presentation Advice
When serving your dosas, the key is in the presentation. stack them neatly on a colorful plate. maybe add a side of vibrant chutneys.
It’s all about that pop of color! use contrasting colors like bright green chutney and rich red sambar to make your plate more appealing.
Perfect Presentation: Serve with Style
Oh my gosh, if there’s a way to make your dosas even more delicious, it’s through presentation! Here’s how to step it up a notch.
Plating Techniques
For a neat look, fold your dosas into quarters or roll them up. It makes them look so fancy! You can even use a homemade banana leaf for a traditional touch – talk about insta-worthy !
Garnish Ideas
Garnishing shouldn’t be an afterthought. toss on some chopped herbs like cilantro or even thinly sliced green chilies sprinkled on top.
It adds a fresh burst of color and flavor that screams “i know how to cook!”
Visual Appeal Tips
Don’t forget about color combinations ! Think about bright greens, deep reds, and sunshine yellows. It makes your plate inviting, and we eat with our eyes first, right?
Storage & Make-Ahead Tips
Let's get real – sometimes we make more dosa batter than we can eat (because it’s so good!). Here’s how to handle leftovers like a pro.
Storage Guidelines
Store your leftover homemade dosa batter in the fridge for up to a week. it can be used for quick breakfasts or snacks.
Just give it a stir and check for consistency before cooking.
Reheating Instructions
If your dosas aren’t as crispy when reheating, pop them in the oven for a few minutes to bring back that crunch. No one wants a soggy dosa!
Creative Variations
Once you nail the basic recipe, the sky's the limit! Dosas can be such a versatile dish .
Flavor Adaptations
Try adding spices to your batter! Turmeric, paprika, or even a pinch of garlic powder can turn your dosa into a flavor explosion.
Dietary Modifications
Got dietary restrictions? You can make a vegan dosa recipe by skipping the ghee and using oil instead. And if gluten’s a concern, you’re golden – dosa is naturally gluten-free!
Seasonal Twists
Why not embrace the seasons? In fall, add some pumpkin puree for a unique flavor twist. Summer? Fresh herbs mixed in for that vibrant taste!
Complete Nutrition Guide
Now, let’s talk about the good stuff—nutrition!
Detailed Breakdown
Homemade dosas provide a great mix of carbs and protein , thanks to the rice and lentils. Each serving is about 110 calories and packed with energy.
Health Benefits
Fermented foods are fantastic for your gut health. So, the next time you whip up a dosa, think of it as a delicious way to boost your body!
Portion Guidance
Aim for 2-3 dosas per serving, especially when paired with sambar and chutneys. They’ll keep you full without feeling weighed down.
Wrapping it Up
Making dosas is more than just cooking; it’s sharing a slice of culture and tradition. whether you’re perfecting the traditional dosa preparation or trying a street food version of dosa , have fun experimenting.
Remember, the best part is enjoying it with friends and family. so go ahead! cook dosa: delicious indian rice pancakes and make your kitchen a hub of happiness.
Happy cooking!
Frequently Asked Questions
What is the best way to cook dosa and make it crispy?
To cook dosa and achieve that signature crispiness, ensure your skillet is properly heated before pouring in the batter. Pour a ladleful of batter and spread it thinly in a circular motion. Use a bit of oil around the edges and cook until the edges turn golden brown. Flipping the dosa for a minute or two can also add extra crunch.
How do I store leftover dosa batter?
Leftover dosa batter can be stored in the refrigerator for up to a week. Make sure to stir it well before using it again, as the batter may separate slightly while stored. If it looks too thick, you can add a little water to adjust the consistency before cooking.
Can I use different types of rice for Cook Dosa: Delicious Indian Rice Pancakes?
Yes, while traditional dosas are made with white rice, you can experiment with different types like brown rice or even a blend of millets. However, keep in mind that altering the rice type may change the texture and flavor. It's best to stick with long-grain rice for the authentic dosa experience.
What are some popular fillings or toppings for dosa?
Popular fillings for dosa include spiced mashed potato (masala dosa), sautéed vegetables, or mixed lentils. You can also top your dosa with cheese or various chutneys like coconut and tomato chutney. For a twist, try adding fresh herbs or pickles for an extra layer of flavor.
How do I know if dosa batter is properly fermented?
Properly fermented dosa batter should have doubled in volume, look bubbly, and exhibit a slightly tangy aroma. This typically occurs after 6–8 hours in a warm environment. If you live in a cooler climate, consider placing the batter in an oven with just the light on to promote fermentation.
What are the nutritional benefits of dosa?
Dosa is a nutritious dish made from rice and lentils, providing a good source of carbohydrates and protein. The fermentation process not only enhances the flavor but also increases the bioavailability of nutrients and promotes gut health through beneficial bacteria. Pairing dosa with chutneys and sambar adds additional vitamins and minerals to your meal.
Crispy Dosa: Authentic Indian Rice Pancakes Card
⚖️ Ingredients:
- 1 cup (200g) white rice
- ¼ cup (50g) split urad dal
- ½ tsp (2g) fenugreek seeds
- 1½ cups (360ml) water
- Salt to taste
- Vegetable oil or ghee for cooking
- Coconut chutney for serving
- Tomato chutney for serving
- Sambar for serving
🥄 Instructions:
- Step 1: Combine rice, urad dal, and fenugreek seeds in a large bowl. Add water to cover and soak for at least 8 hours or overnight.
- Step 2: Drain the soaked grains and transfer to a blender. Add a little fresh water, then blend until smooth and fluffy, forming a thick batter. Transfer to a bowl and let it ferment in a warm place for about 6-8 hours.
- Step 3: Once fermented, stir the batter gently and add salt to taste. Heat a skillet over medium heat and lightly grease it with oil or ghee.
- Step 4: Pour a ladleful of batter onto the skillet, spreading it into a thin circular shape. Drizzle a bit of oil around the edges and on top. Cook for about 2-3 minutes or until the edges are golden.
- Step 5: Gently flip the dosa using a spatula and cook for an additional minute if you prefer a crispy texture. Repeat with the remaining batter.
- Step 6: Serve hot with coconut chutney, tomato chutney, or sambar.
Previous Recipe: How to Cook Choliya Tasty Chickpea Delight: An Amazing Hearty Dish
Next Recipe: How to Make Blend Mango Delightful Coffee Refreshment: 5 Easy Tips!