Bake Sesame Cheese Buns - Deliciously Soft
Craving something soft and cheesy? Bake Sesame Cheese Buns - Deliciously Soft with this kitchen-tested recipe that brings comfort and flavor to your table!

- Discovering the Joy of Bake Sesame Cheese Buns - Deliciously Soft
- Essential Ingredients Guide: Your Go-To for Baking Success
- Mastering the Art of Professional Cooking
- Pro Tips & Secrets
- Perfect Presentation
- Storage & Make-Ahead
- Creative Variations
- Complete Nutrition Guide
- Expert FAQ Solutions
- In Conclusion
- Recipe Card
Discovering the Joy of Bake Sesame Cheese Buns - Deliciously Soft
Have you ever found yourself in front of a warm oven, inhaling that glorious smell, and wondered what magic happens inside? that's what i experienced one chilly afternoon when i decided to experiment and bake sesame cheese buns - deliciously soft .
Just imagining that first bite—soft, cheesy, and topped with those nutty sesame seeds—made my mouth water. honestly, nothing beats the feeling of homemade comfort food, and these buns hit all the right notes.
Why These Buns Are Special
Let’s take a stroll down memory lane, shall we? cheese buns have been around for centuries in various cultures, each one adding its twist.
These soft cheese buns have roots in eastern europe, where families often gathered to share bread, laughter, and love. fast forward to today, and you can find these beauties making a comeback across the globe, especially in cozy cafés and family kitchens.
Now, don’t let the multiple steps intimidate you. although it seems like a medium-level challenge, trust me—once you get the hang of it, shaping those fluffy sesame rolls becomes second nature.
Plus, they’ll only take about two hours from start to finish, which is pretty much a netflix episode, right? and don’t get me started on the cost—making homemade cheese buns is way easier on your wallet than grabbing a latte and a pastry at that trendy spot down the street.
What's in It for You?
So, what’s the hype with these buns? first off, let’s talk health benefits . sure, they’re delicious and comforting, but they’re also surprisingly nutritious.
Packed with protein from the cheese and made with wholesome ingredients, these buns are guilt-free snacks that can fuel your day.
Plus, you can whip up a batch for breakfast, and they work great as appetizers when friends come over. imagine serving them warm right out of the oven!
Now, let’s dive a bit deeper. one of the most enticing aspects of making these cheesy fluffy buns at home is the freedom to customize.
Feel like adding some garlic or herbs? go for it! want to create a vegetarian option or play around with trendy dairy-free bun options ? you’ve got it! with versatile cheese fillings , you could even mix cheddar with some spicy pepper jack to give it a little kick.
It gets better: these buns are a multi-stage baking delight. you knead the dough, give it time to rise, and then you get to shape them.
It may feel like a lot of work, but taking that time builds a wonderful flavor. oh, and the baking tips for beginners ? they’re just about patience, practice, and a dash of love!
Wrapping It Up
In summary, whether you're preparing for a light breakfast, a fun snack idea, or planning to impress guests with an appetizer recipe, these light and airy buns are just what you need.
They effortlessly blend convenience with flavor and beauty—perfect for meal prep ideas or just because. now, let’s not wait any longer.
Ready to roll? let’s hop into the ingredients and get this feast started!
Essential Ingredients Guide: Your Go-To for Baking Success
So, you're ready to whip up some bake sesame cheese buns - deliciously soft , huh? let’s break down the essential ingredients first.
Trust me; getting to know your ingredients well can make all the difference between a flop and a baking masterpiece!
Premium Core Components
When you’re diving into the world of baking, the quality of your ingredients matters. First up, you’ll need:
-
4 cups (480g) all-purpose flour — this is the backbone of your cheesy buns. look for flour that’s fresh and free from lumps.
A good sign? if you can’t find the expiration date, it’s time to say bye-bye!
-
2 teaspoons (7g) of instant yeast — A little bit of magic here. Make sure your yeast is fresh. Check the date! If it bubbles when mixed with warm milk, you’re golden.
-
1 ½ cups (360ml) warm milk (around 110° F or 43° C) — You want it warm, not hot like lava. It should feel like a cozy bath for your yeast!
-
1/4 cup (60ml) unsalted butter, melted — Skip the margarine, please! Real butter gives that delightful richness.
-
1 large egg — Brings it all together. Just make sure it’s at room temp for best results.
Store your ingredients properly. keep flour in a cool, dry place and give that cheese a good chill in the fridge.
Want freshness? the earlier you use your ingredients after opening, the better.
Signature Seasoning Blend
Now let’s get funky with flavors! Your bread isn’t just about the dough; it needs a little jazz. Here's where you can shine:
-
Cheese ! Go all out with 1 cup (100g) shredded cheddar or mozzarella. Get ready for those delightful cheese-filled snacks to oooze out of your buns!
-
Sesame Seeds — Those little crunchy toppings? Essential! They add flavor and that gorgeous “look at me” vibe.
And don’t worry about getting fancy; you can sprinkle your favorite herbs too! Think garlic powder or even Italian seasoning for a twist.
Smart Substitutions
Life happens, and sometimes the ingredient you wanted just isn’t in your pantry. No worries, I’ve got your back! Here are some common alternatives:
-
No butter? Use oil instead — it’ll work, but you won’t get that buttery taste.
-
Gluten-free? Swap the all-purpose flour with a gluten-free blend , making sure it has xanthan gum for proper texture.
-
Dairy-free friend coming over? Almond or oat milk works just fine! Replace butter with a dairy-free version, too.
And if you ever find yourself in a pinch, swap out that warm milk with good ol’ water. It won’t be the same, but it’ll keep your buns light and airy.
Kitchen Equipment Essentials
Ugh, kitchen clutter can be a nightmare, can’t it? But some tools are non-negotiable.
-
Whisk — For combining your dry ingredients.
-
Mixing Bowls — A few of different sizes will save your sanity.
-
Rolling Pin — You’ll want this baby for rolling out your dough.
-
Baking Sheet & Parchment Paper — Trust me, nothing beats easy cleanup.
For prep, keep your measuring cups and spoons handy. Accuracy is key for that fluffy sesame roll consistency you crave.
Cooking Time & Tips
Remember, baking is as much about patience as it is about skill. let that dough rise properly! if you rush, your buns might end up more like door stoppers than the soft cheese buns of your dreams.
And when you’re ready for some baking action, I’ll guide you through those dough preparation techniques step by step.
So grab your apron, warm up that milk, and let's get mixing! It’s about to get deliciously fun as we dive into the instructions for creating those fluffy sesame rolls that'll have everyone begging for the recipe!
Ready? Let’s bake some magic!
Mastering the Art of Professional Cooking
When it comes to professional cooking methods, honing certain techniques is key. hey there, fellow kitchen adventurer! today, i want to share some essential tips and tricks you’ll want to keep in your back pocket.
They can seriously up your cooking game and guide you to make a scrumptious treat, like bake sesame cheese buns - deliciously soft !
Getting Ready: Essential Preparation Steps
Alright, let’s talk mise en place (that fancy french term meaning "everything in its place"). this step is all about having your ingredients prepped and ready before you start cooking.
Trust me, it’s a real game changer! chop your herbs, measure out your flour, and grate that cheese. it'll save you time and keep your flow smooth while you whip up those fluffy sesame rolls.
Now, let’s not forget about time management . set timers for different stages of your bake—like when to knead or rest the dough.
Even i’ve had moments where i got lost in the music and chaos of my kitchen. timer to the rescue!
Also, think about your organization strategies . use clear containers or bowls for holding your ingredients. and hey, always keep the kitchen tidy while you work.
No one wants cooking chaos (trust me!).
Safety first, right? make sure to keep your workspace clean and tools sharp. wear shoes that won’t slip, and let’s keep that first aid kit within reach.
You never know when a kitchen accident might happen.
A Step-By-Step Journey
So, you’re geared up, and now the real fun begins! Here’s the game plan for making your cheese-filled snacks :
-
Prep and activate yeast : warm up 1 ½ cups of milk (at about 110° f or 43° c) , stir in sugar and yeast , then let it foam for about 5- 10 minutes .
You want it frothy, like a little magic potion!
-
Make the dough : grab a big bowl and combine 4 cups of flour with 1 teaspoon of salt . create a well in the middle, then add your activated yeast mix, 1 large egg , and 1/4 cup melted butter .
Get in there and mix until it forms a rough dough.
-
Knead the dough : time to roll up those sleeves! knead your dough on a floured surface for 8- 10 minutes .
This is where you get that light and airy texture .
-
First Rise : Pop your dough in a greased bowl and cover it. Let it rise for 1 hour or until it’s doubled in size. Make sure it’s in a warm spot!
-
Shape the Buns : Punch it down! Flatten and divide your dough into 12 equal pieces. Fill them with cheese, fold, and shape them into balls.
-
Second Rise : Place them on a lined baking sheet, cover, and let rise for another 30 minutes .
-
Preheat the Oven : Crank that baby up to 375° F ( 190° C) .
-
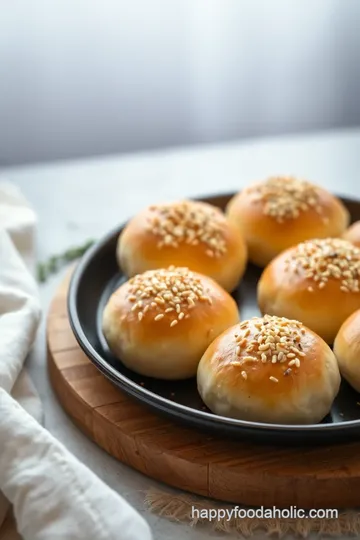
Prepare for Baking : Brush the tops with egg wash and sprinkle on those sesame seeds —such a classic touch!
-
Bake : Time to bake! Slide them in for 20 minutes , or until they’re golden brown.
-
Cool and Serve : Let them cool on a rack for a few minutes. Then, oh boy, dig in!
Expert Techniques and Success Strategies
Now, let’s get a little more gourmet here. the art of baking with yeast can sometimes feel tricky. one simple tip—always check the expiration date on your yeast! if it’s old, toss it; your buns will thank you.
Quality checkpoints are important. Visual cues for doneness are key: golden brown tops and a hollow sound when you tap the bottom.
Here’s where i had to learn the hard way: avoid overkneading. too much love can make your homemade cheese buns tough.
If you’re seeing cracks all around, you’re probably working it too much.
And hey, common mistakes? Don't skip that second rise! It’s crucial for those fluffy buns.
Wrap It Up!
Baking can feel overwhelming, but with the right strategies, you can make these mouthwatering savory baking creations like a pro.
Think of this as a cheat sheet for deliciousness. and if you’re planning to meal prep, those buns freeze beautifully! just pop them in an airtight container, and you have your nutritious homemade snacks ready to go!
So, now you know all about professional cooking methods that will leave your friends and family craving more. the best part? you can easily adjust these techniques with different flavors or fillings.
Next up, i’ll share some additional information on how to get creative with your baking and enhance those flavors in fun ways! can't wait to dive in with you!

Pro Tips & Secrets
Let's kick things off with some pro tips that i’ve gathered over the years! first off, when you're baking sesame cheese buns - deliciously soft , make sure to pay attention to your yeast activation .
Nobody wants flat buns, right? so, keep your milk at about 110° f . it should feel like a warm bath.
If it's too hot, you'll kill the yeast, and if it's too cold, it won't activate. timing is everything!
Next, let’s chat about time-saving techniques . if you're like me and juggling a million things at once, here's a little trick: when you're letting the dough rise, do something else! it's the perfect time to catch up on a show, read a book, or, you know, take a nap (no judgment here!).
When it comes to flavor enhancement , don’t be shy. put in a pinch of sea salt or a sprinkle of garlic powder in your cheese filling.
Trust me, it takes those cheesy fluffy buns to the next level! and for presentation advice , think about the vibe you want.
A rustic look? serve in a wooden bowl. more elegant? a stylish platter does wonders.
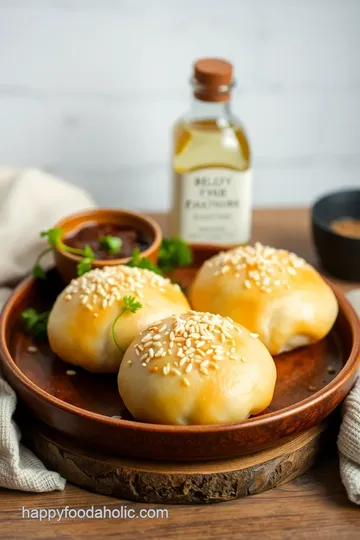
Perfect Presentation
Okay, now let’s talk about presentation . we eat with our eyes first, right? when plating your soft cheese buns, arrange them in a circle on a platter, and drizzle some olive oil or melted butter in the center.
It makes for a gorgeous centerpiece!
For garnish ideas , consider fresh herbs! a sprinkle of chopped parsley or cilantro adds a pop of color. want to wow your guests? a dusting of paprika can really elevate the dish.
Pair those light and airy buns with some colorful veggies or a simple salad for an impressive splash of color!
Storage & Make-Ahead
Now, if you’re thinking of making these ahead, i totally get it. meal prep is the name of the game! you can store these babies in an airtight container for up to three days.
For longer storage, pop them in the freezer. just allow them to cool completely before wrapping them tightly. when you're ready to enjoy, let them thaw in the fridge overnight.
Reheating instructions ? Easy peasy! Just pop them in a preheated oven at 350° F for about 10 minutes to warm them up and get that crust crispy again!
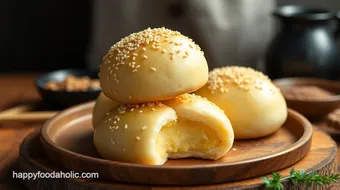
Creative Variations
Feeling adventurous? let’s explore some creative variations ! you can totally mix up the cheese fillings—think ricotta or a spicy pepper jack for some heat.
How about turning these into savory breakfast buns ? add cooked sausage or crispy bacon. yum!
For a dairy-free bun option , try using almond milk and coconut oil. and if gluten isn’t your thing, swap out the regular flour for a gluten-free blend .
Trust me, you won't miss a beat with these homemade cheese buns !
Complete Nutrition Guide
Now, let’s get real about the nutritional side. these cheesy fluffy buns pack some benefits! with about 180 calories per bun and a decent protein boost, they’re a satisfying snack or breakfast option.
If you're considering dietary modifications , remember that using whole grain flour adds more fiber, making it a bit healthier.
Always monitor those portion sizes - two buns might be too tempting to resist when they’re this good!
Expert FAQ Solutions
Let’s answer some of those burning questions. Why didn't my buns rise? Most likely, your yeast was old or the milk was off. Always check expiration dates, y’all!
If your dough feels sticky , just sprinkle a little more flour when kneading. Alternatively, if it seems too dry, a splash of water can help!
And don't hesitate to experiment. Each time I make these fluffy bread rolls , I learn something new!
In Conclusion
In the world of comfort food recipes , these bake sesame cheese buns - deliciously soft will surely steal the show.
So, preheat your oven, roll up those sleeves, and dive into this easy bun recipe! you’ve got this! when you pull those soft cheese buns out of the oven, the aroma alone will have everyone running to the kitchen.
Happy baking, and enjoy every cheesy bite !
Bake Sesame Cheese Buns - Deliciously Soft Card
⚖️ Ingredients:
- 4 cups (480g) all-purpose flour
- 2 teaspoons (7g) instant yeast
- 1 teaspoon (6g) salt
- 1 tablespoon (12g) sugar
- 1 ½ cups (360ml) warm milk (110°F or 43°C)
- 1/4 cup (60ml) unsalted butter, melted
- 1 large egg
- 1 cup (100g) shredded cheese (e.g., cheddar, mozzarella)
- 1/4 cup (40g) sesame seeds
- 1 egg (beaten, for egg wash)
🥄 Instructions:
- Step 1: In a bowl, warm the milk and stir in sugar and yeast. Let it rest until frothy (about 5-10 minutes).
- Step 2: In a large mixing bowl, combine flour and salt. Make a well in the center; add melted butter, egg, and the yeast mixture. Mix until a dough forms.
- Step 3: Turn the dough out onto a floured surface; knead for 8-10 minutes until smooth and elastic.
- Step 4: Place the dough in a greased bowl, cover with plastic wrap, and let rise until doubled in size (about 1 hour).
- Step 5: Punch down the dough and turn it out onto a floured surface. Divide into 12 equal pieces, flatten each piece, and place a tablespoon of cheese filling in the center. Fold and shape into balls.
- Step 6: Place shaped buns onto a parchment-lined baking sheet, cover, and let rise again until puffy (about 30 minutes).
- Step 7: Preheat the oven to 375°F (190°C).
- Step 8: Brush the buns with beaten egg and sprinkle sesame seeds on top.
- Step 9: Bake for 20 minutes, or until golden brown and cooked through.
- Step 10: Allow the buns to cool on a wire rack before serving.
Previous Recipe: Best Fried Chicken Fillets with Delicious Gravy: A Comforting Dinner!
Next Recipe: How to Make Quick Roti Dough: Easy & Delicious, Just Like Grandma's!