Bake Pizza Fingers: Quick & Tasty Treats
Looking for the perfect party snack? Try my Bake Pizza Fingers: Quick & Tasty Treats! These cheesy delights are a family favorite. Get the recipe now!

- Start This Flavorful Journey: Bake Pizza Fingers
- What’s the Deal with Pizza Fingers?
- Why Bake Pizza Fingers Are a Must-Try
- So, Ready for Pizza Finger Action?
- Essential Ingredients Guide for Bake Pizza Fingers: Quick & Tasty Treats
- Premium Core Components
- Signature Seasoning Blend
- Smart Substitutions
- Kitchen Equipment Essentials
- Cooking & Baking Tips
- Professional Cooking Method for Bake Pizza Fingers: Quick & Tasty Treats
- Pro Tips & Secrets for Bake Pizza Fingers
- Perfect Presentation
- Storage & Make-Ahead
- Creative Variations
- Complete Nutrition Guide
- Frequently Asked Questions
- Recipe Card
Start This Flavorful Journey: Bake Pizza Fingers
Ever had one of those days where you just crave pizza but want something a bit different? i totally get you! a while back, i had a bunch of friends over for game night.
We had the usual pizza on the table, but i wanted to surprise them with something special. that’s when i decided to whip up bake pizza fingers: quick & tasty treats .
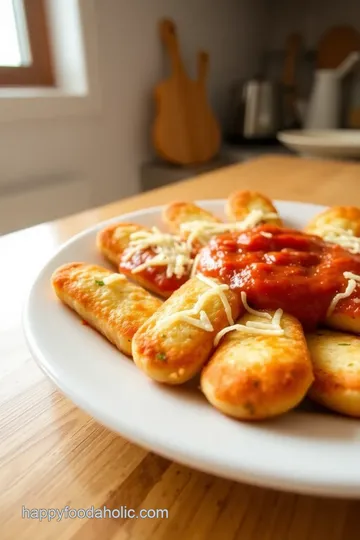
Let me tell you, they were a hit! can you picture biting into a flaky crust packed with gooey cheese and all your favorite toppings? heaven on a plate!
These tasty pizza snacks are not just for the grown-ups; they’re the ultimate kid-friendly recipes too! i remember my niece popping one into her mouth and running around with joy.
If you’ve got little ones, they’ll love these savory bites. and the best part? you can customize them to fit all those picky eaters out there.
What’s the Deal with Pizza Fingers?
Okay, so let’s take a little trip down pizza lane. pizza, as we all know, has its roots in italy, but it has totally morphed into an american classic that everyone loves.
Bake pizza fingers put a playful spin on the traditional pizza we all know, creating the perfect party snacks . you can whip them up in about an hour, and trust me, they’re super easy.
You can choose your ingredients, keeping it simple or loading them up with your favorites.
When it comes to costs, this recipe is budget-friendly, especially if you make your own dough. And trust me, it yields around eight delightful fingers, which is perfect for sharing—if you are feeling generous!
Why Bake Pizza Fingers Are a Must-Try
Let’s talk about the benefits, shall we? first off, these little fingers are packed with flavor and can be made pretty healthy depending on what you throw in there.
With ingredients like cheese and pizza sauce , you’re looking at a solid combo of protein and carbs—hello, comfort food!
These are not only great as appetizers, but they can also be the main star or just a fun side dish.
Perfect for game night snacks or even a casual weekend family dinner. they beat regular chips and dips any day! pair them with your favorite dipping sauces , and you’ve got a delightful spread.
Another cool thing? you can play around with different fillings. want a vegetarian twist? throw in spinach and mushrooms. prefer something spicy? slice up peppers and add a hint of heat.
With so many easy pizza recipes out there, the variations are endless!
So, Ready for Pizza Finger Action?
Now that i’ve whetted your appetite, let’s gather those ingredients! it’s time to roll up your sleeves and dive into the comfort of baking.
You’ll want to make sure you have your dough chilled and your toppings prepped. trust me, it helps in the assembly stage and leads to a crispier treat.
Now, if you’re getting older like me and can’t handle as much grease, bake pizza fingers will give you that crispy bite without the guilt.
Seriously, whether you’re making gluten-free pizza options or going for classic pepperoni, these babies are just the ticket. and i’m excited to see what combinations you all come up with!
Let’s get started on the ingredients, and I’ll walk you through how to create these perfect finger-friendly food . Can't wait for you to give them a try!
Essential Ingredients Guide for Bake Pizza Fingers: Quick & Tasty Treats
Let’s dive into the world of bake pizza fingers ! they’re not just a yummy snack; they’re a way to bring everyone together—perfect for family dinners, game nights, or even just lazy weekends.
But before we get cooking, let’s cover the essential ingredients you’ll need to whip up these tasty treats.
Premium Core Components
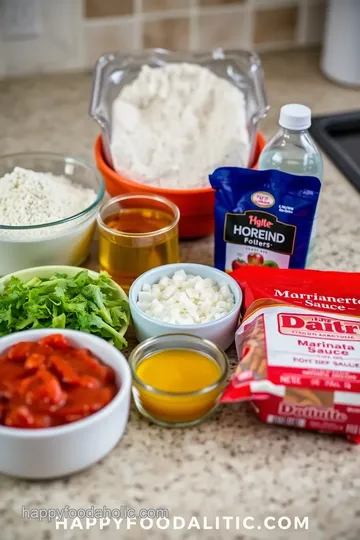
To get started, having the right ingredients really sets the stage for success. Here’s what you need:
- For the Dough:
- 1 cup (125g) all-purpose flour
- 1 teaspoon baking powder
- 1/4 teaspoon salt
- 2 tablespoons (30ml) olive oil
- 3-4 tablespoons (45-60ml) cold water
When you’re down in the trenches baking, quality really matters! go for fresh flour and a good olive oil; these simple ingredients can really elevate your pizzas from "meh" to wow ! store your flour in a cool, dry place, and it’ll last for about a year.
Always check for any funky smells—even flour can go bad.
Signature Seasoning Blend
Next up is the filling! This is where all the magic happens . You’ll need:
- 1/2 cup (120ml) pizza sauce
- 1 cup (120g) shredded mozzarella cheese
- 1/3 cup (50g) diced pepperoni or your choice of toppings
- 1 tablespoon (15g) grated Parmesan cheese
- 1 teaspoon dried oregano
- 1/2 teaspoon garlic powder
The combo of mozzarella and parmesan brings cheesy goodness. when picking cheese, look for that freshly shredded kind instead of pre-packaged for a better melt.
And don't forget—fresh herbs make a difference! if you can snatch them up, use fresh oregano instead of dried for that extra burst of flavor.
Fresh herbs can usually hang out in your fridge for about a week.
Smart Substitutions
Now, life happens, and sometimes you don't have everything you need. No worries! Here are some smart substitutions :
- Swap out all-purpose flour for gluten-free flour if you’re catering to specific diets.
- Don’t have pizza sauce? Try some pesto for a zesty twist .
- If you find yourself short on cheese, you can mix in some cottage cheese or Greek yogurt to maintain that creamy texture.
You know, cooking is like parenting—sometimes things don't go as planned, but it all works out in the end! Just use what you've got, and you’ll be fine.
Kitchen Equipment Essentials
Okay, time to talk tools! Here's your kitchen equipment list :
- Mixing bowl
- Rolling pin
- Baking sheet
- Parchment paper
- Pizza cutter or knife
- Optional: Pastry brush
Honestly, you can get away with a lot in the kitchen with just a mixing bowl and a baking sheet.
But having that pizza cutter on hand? game-changer. it makes cutting those pizza fingers super easy. if you're rolling out dough, a good rolling pin is essential for getting that perfect thickness.
Cooking & Baking Tips
Here’s the deal—chilling your dough is the MVP move. Wrap it in plastic wrap and let it rest for about 30 minutes . This step helps you roll it out super smoothly.
When you finally pop those bad boys in the oven, keep an eye on them! bake for 15- 20 minutes until golden brown.
You want that crunchy outer layer with a melty inside—true pizza perfection!
And just a little golden rule: always read the packaging for how long your items last and how best to store them. A little planning goes a long way.
Now that you’re all equipped with the essentials, it’s time to get into the fun part! Ready to bake up these delicious Bake Pizza Fingers: Quick & Tasty Treats ? Let’s go step-by-step through the process and get those cheesy snacks ready to rock your next movie night or game day feast!
Professional Cooking Method for Bake Pizza Fingers: Quick & Tasty Treats
If you’re gearing up for some epic game nights or just want to treat yourself and the fam, you gotta try these bake pizza fingers ! they’re easy, cheesy, and honestly, who doesn’t love finger foods? with a flaky crust wrapped around all your favorite pizza toppings, it’s comfort food at its best.
Let's dive into the nitty-gritty of getting those pizza fingers just right!
Essential Preparation Steps
Before we jump into cooking, let's talk about setting yourself up for success. A little organization goes a long way!
Mise en place : this fancy term just means “everything in its place.” gather all your ingredients: flour, baking powder, cheese, toppings, you name it! having everything ready makes cooking smoother and prevents that frantic last-minute dash.
Time management tips : keep an eye on your clock. you’ll spend about 15 minutes preparing , 30 minutes chilling , and 20 minutes baking .
Setting a timer helps keep you on track.
Organization Strategies : Clear your workspace. A clean counter makes it easier to roll out dough and assemble those tasty fingers. Plus, it helps get you in the zone!
Step-by-Step Process
Here’s the juicy part! Follow these numbered steps for pizza perfection, with some crucial points on timing and temperature.
-
Make the dough : start by mixing 1 cup of flour with 1 teaspoon of baking powder and 1/4 teaspoon of salt .
Add 2 tablespoons of olive oil , and mix until it’s crumbly. gradually add cold water until a dough forms—this part is super fun!
-
Chill : Wrap the dough and toss it in the fridge. Chilling it for 30 minutes helps with the handleability later.
-
Prepare the filling : combine 1/2 cup of pizza sauce , 1 cup of shredded mozzarella , 1/3 cup of diced pepperoni , and spices.
This filling is the heart of your pizza snacks !
-
Roll It Out : Preheat your oven to 400° F . On a floured surface, roll that chilled dough out to about 1/4 inch thick. Aim for rectangles, about 4x2 inches .
-
Assemble : Spoon your filling onto half of each rectangle. Fold it over, seal it up, and brush the tops with olive oil for that perfect crunch.
-
Bake : place on a baking sheet lined with parchment paper and slide them into that hot oven for 15- 20 minutes until they're golden brown.
Trust me; the aroma will have everyone lining up!
Expert Techniques
These pizza rolls are meant to impress, so keep a few expert tips in mind.
-
Temperature Control Points : Knowing your oven is key! Ovens can be tricky, so keep a close eye on that golden brown color so you catch them at just the right moment.
-
Critical Steps Explained : Don’t skip chilling the dough—it really makes a difference in the texture.
-
Quality Checkpoints : Look for that perfect golden color and flaky texture on the outside.
Success Strategies
Let’s make sure your pizza fingers are absolute showstoppers!
-
Common Mistakes to Avoid : Don’t overfill them! You want to seal those edges well; otherwise, you’ll have a pizza explosion in your oven. Been there, done that!
-
Quality Assurance Tips : Give them a gentle squeeze before baking. They should hold firm but still feel soft to the touch.
-
Make-Ahead Options : You can even assemble these ahead of time and pop them in the fridge until you're ready to bake. Super handy for last-minute guests!
Cooking is all about having fun and experimenting. Don't be afraid to play around with fillings!
Additional Information
So now that you’re armed with everything you need to bake pizza fingers: quick & tasty treats , it’s time to dive into some more ideas.
Want to make these even tastier? think pizza-inspired appetizers or how about pairing them with a killer dip? trust me, these mini munchies will be the hit of any party or family dinner.
Happy cooking, y’all, and may your kitchen be filled with delicious aromas!
Pro Tips & Secrets for Bake Pizza Fingers
Alright, let’s dive into the secrets that’ll make your bake pizza fingers: quick & tasty treats a hit! trust me, no one wants a dry, bland snack, especially when it comes to pizza snacks.
Here are some of my go-to tips:
Chef’s personal insights: always err on the generous side with cheese. mozzarella is a must, but feel free to mix in some cheddar or even blue cheese for that wow factor.
You know that feeling when you bite into a cheesy snack, and it just melts in your mouth? that’s what we’re aiming for!
Time-saving techniques: here’s a pro tip: prepare your filling in advance . you can store it in the fridge for up to a day.
Doing this gives the flavors time to blend and really pop.
Flavor enhancement tips: don’t forget about seasoning! a sprinkle of italian seasoning or crushed red pepper flakes can elevate those flavors.
Seriously, i throw dried oregano and garlic powder into everything—i can’t help it!
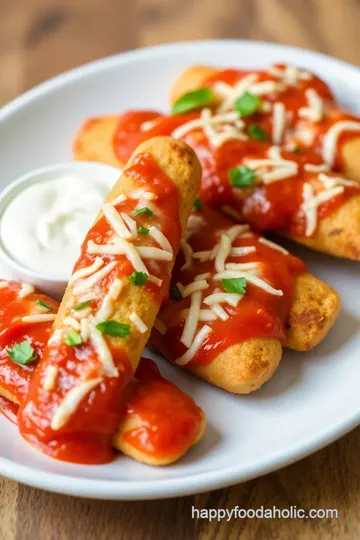
Presentation advice: now, for the glam! laying out your pizza fingers on a cute platter with some dipping sauces (like a zesty marinara or a creamy ranch) makes everything look way more inviting.
A little sprinkle of parsley on top can add that fancy touch.
Perfect Presentation
You won’t just want these pizza fingers to taste good; you want them to look good too, right? Here’s how to make ‘em pop!
Plating Techniques: Stack them up neatly or lay them out in a fan shape. Keep the little pizza rolls standing if you can for that “wow” factor.
Garnish Ideas: Fresh herbs like basil or parsley not only look beautiful but add even more flavor. It’s a win-win!
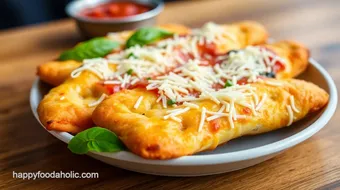
Color Combinations: Get playful with your toppings and fillings. Bright green peppers, red pepperoni, and golden crust? Heck yes!
Visual Appeal Tips: Make sure they’re crisp and golden brown—nobody wants to bite into a sad-looking finger food. That golden hue? It’s basically an Instagram filter for food.
Storage & Make-Ahead
Got leftovers? No worries! Here’s how to keep your homemade pizza snacks fresh.
Storage Guidelines: Place cooled pizza fingers in an airtight container. They’ll stay fresh in the fridge for about three days. Just don’t blame me if they vanish faster!
Preservation methods: if you want to keep ‘em longer, freeze them before baking. pop them into a zip-top bag, and they’ll be good for about a month.
When you're ready, just bake them straight from the freezer—no thawing needed.
Reheating Instructions: To reheat, pop them back in the oven for about 10 minutes at 350° F to get that crispy texture back. Microwaving will make them soggy—yikes!
Freshness Duration: Honestly, they’re best enjoyed fresh. But when you have some day-old pizza fingers, you could still whip them back into shape!
Creative Variations
Get ready to think outside the pizza box with some amazing recipe variations!
Flavor Adaptations: Instead of traditional toppings, why not try a pesto pizza finger ? Spread some pesto instead of sauce, throw in some roasted veggies or chicken, and bam!
Dietary Modifications: Need gluten-free pizza options? Use a gluten-free flour blend, or even cauliflower dough for a lighter version. Your gluten-free pizza lovers will appreciate you!
Seasonal Twists: Make use of seasonal veggies. In summer, get juicy tomatoes and fresh basil; in winter, go for roasted squash or that comforting flavor of caramelized onions.
Regional Variations: Think Chicago deep dish fillings in a finger-friendly format! Layer it with pizza ingredients and a thick sauce layer, and you’ll have a winner.
Complete Nutrition Guide
Let’s talk about what’s in those yummy bites!
Detailed Breakdown: Each serving gives you about 300 calories , with a good mix of protein and carbs. Perfect for a snack or light meal!
Health Benefits: The mozzarella gives you calcium, and adding more veggies ramps up your fiber. Win-win for those wanting a tasty treat without sacrificing health!
Dietary Considerations: If you’re watching sodium, skip the extra cheese and choose low-sodium pepperoni. Options all around!
Portion Guidance: These are finger foods, so two fingers per person is a safe bet, but you know your crowd! If it’s game night, you might want to prepare a double batch.
To wrap this up, making your own bake pizza fingers: quick & tasty treats is not just about satisfying cravings; it's a fun culinary adventure with friends and family.
So get in the kitchen, embrace the messiness of baking with kids, and remember—life’s too short for boring snacks! you got this!
Frequently Asked Questions
How can I customize the filling for my Bake Pizza Fingers: Quick & Tasty Treats?
You can easily customize the filling by using different cheeses, such as cheddar or feta, and adding your favorite toppings like vegetables, meats, or herbs. For a veggie twist, consider using sautéed bell peppers, mushrooms, or spinach. Don't hesitate to get creative and try different combinations to suit your taste preferences!
Can I make Bake Pizza Fingers ahead of time?
Yes! You can prepare the pizza fingers ahead of time by assembling them and then freezing them unbaked. Just place them in a single layer on a baking sheet, freeze until solid, and then transfer to a freezer-safe bag. When you're ready to bake, simply increase the cooking time by a few minutes without thawing.
What are some tips for getting the best texture on my Bake Pizza Fingers?
To achieve an excellent texture, make sure to chill your dough for at least 30 minutes before rolling it out. This improves handling and results in a flakier crust. Additionally, brushing the tops with olive oil before baking can help create a nice, golden color and crispiness!
How do I store leftover Bake Pizza Fingers?
Store any leftovers in an airtight container in the refrigerator for up to 3 days. To reheat, simply bake in a preheated oven at 350°F (175°C) for about 10-12 minutes until warmed through. You can also use an air fryer for a quick and crispy reheating option!
Are Bake Pizza Fingers suitable for kids, and what is the nutritional information?
Yes, Bake Pizza Fingers are a kid-friendly treat! They offer a fun way for children to enjoy pizza flavors in a bite-sized format. Each serving (2 pizza fingers) contains approximately 300 calories, with 12g of protein and varying fat and carbohydrate values—making them a tasty option for family meals or snacks.
Can I use store-bought dough for the Bake Pizza Fingers recipe?
Absolutely! If you're short on time, using store-bought refrigerated pizza dough is a great alternative. Just roll it out as directed in the recipe and fill it with your preferred toppings and sauce for a quick and easy version of Bake Pizza Fingers.
Bake Pizza Fingers: Quick & Tasty Treats Card
⚖️ Ingredients:
- 1 cup (125g) all-purpose flour
- 1 teaspoon baking powder
- 1/4 teaspoon salt
- 2 tablespoons (30ml) olive oil
- 3-4 tablespoons (45-60ml) cold water
- 1/2 cup (120ml) pizza sauce
- 1 cup (120g) shredded mozzarella cheese
- 1/3 cup (50g) diced pepperoni
- 1 tablespoon (15g) grated Parmesan cheese
- 1 teaspoon dried oregano
- 1/2 teaspoon garlic powder
🥄 Instructions:
- Step 1: In a mixing bowl, combine the all-purpose flour, baking powder, and salt.
- Step 2: Add olive oil and mix until crumbly.
- Step 3: Gradually add cold water, mixing until a dough forms. Knead briefly until smooth.
- Step 4: Wrap dough in plastic wrap and chill for 30 minutes.
- Step 5: In a separate bowl, mix together the pizza sauce, mozzarella cheese, pepperoni, Parmesan, oregano, and garlic powder.
- Step 6: Preheat the oven to 400°F (200°C).
- Step 7: On a floured surface, roll out the chilled dough into a rectangle about 1/4 inch thick.
- Step 8: Cut the dough into rectangles (about 4x2 inches).
- Step 9: Place a generous spoonful of filling on one half of each rectangle.
- Step 10: Fold the dough over the filling and press the edges to seal.
- Step 11: Brush the tops with olive oil for crispiness, if desired.
- Step 12: Place pizza fingers on a parchment-lined baking sheet.
- Step 13: Bake for 15-20 minutes or until golden brown.
- Step 14: Cool slightly before serving.
Previous Recipe: Make Spicy Alfredo Sauce in 15 Minutes: A Creamy & Zesty Delight!
Next Recipe: Deliciously Quick: Cook Spicy Nepali Chicken in 30 Minutes!