Arepa Catira
Craving a delicious meal? Learn how to make Arepa Catira, a delightful Venezuelan dish filled with chicken and cheese. Try it now!

- Have You Ever Tried Making Arepas?
- Arepa Catira: A Culinary Journey
- Why This Recipe Will Amaze You
- Health and Nutrition Highlights
- Recipe at a Glance
- Quality Ingredients Breakdown
- Kitchen Equipment Essentials
- Recipe Name: Arepa Catira
- Success Guaranteed Tips
- Perfect Presentation
- Storage and Make-Ahead
- Creative Variations
- Complete Nutrition Guide
- Expert FAQ Solutions
- Recipe Card
Have You Ever Tried Making Arepas?
If you haven’t, let me ask you this: what stops you? maybe it’s the thought of mastering a new cooking technique or trying your hand at yet another unfamiliar recipe.
But trust me, once you get the hang of it, you’ll be spinning out delightful arepas like a pro. they’re not just easy to craft; these mouthwatering venezuelan goodies can transform a simple meal into a fiesta of flavor.
In just 30 minutes, you can whip up 4 delicious arepa catira, with a skilfully simple method that even the most kitchen-challenged among us can handle.
Let’s take a little stroll down culinary history. arepas have been a staple in south american cuisine for centuries, originally crafted by the indigenous people of venezuela and colombia, known for their versatility and satisfaction.
These delightful pockets of cornmeal can be grilled, baked, or fried, which makes them incredibly adaptable to whatever flavors you have on hand.
I mean, who can resist warm, pillowy goodness? what makes this recipe special is the filling, which is typically a scrumptious combination of juicy shredded chicken and melted cheese, along with whatever toppings tickle your fancy—avocado, black beans, or even that hot salsa you keep at the back of your cupboard.
Arepa Catira: A Culinary Journey
Diving into the heart of latin american cuisine, the arepa catira brings a rich culinary heritage to life. they have a fascinating origin story, being named after the traditional filling of shredded chicken and cheese.
The cultural significance of arepas can’t be overstated; they’re a national dish, often enjoyed for breakfast, lunch, or dinner. and in modern times, they have exploded in popularity, popping up on menus everywhere from casual eateries to upscale restaurants.
Why This Recipe Will Amaze You
Are you ready for the best part? the unique flavor combinations truly elevate the humble arepa. the technique? oh-so-simple! even if, like me, you've made a few cooking blunders along the way (hello, overcooked arepas that turned into corn frisbees), you’ll quickly learn this foolproof method.
Plus, i’ve got my on-the-ground tips from trial and error, so you'll avoid my rookie mistakes. need to save time? i’ve got your back with speedy preparation strategies too.
Health and Nutrition Highlights
And while we’re feasting, let’s chat health! arepa fillings can be nutritious, providing a solid serving of protein from chicken or beans, and healthy fats if you choose to add in that smooth avocado.
They are also gluten-free, which is a bonus for anyone with dietary restrictions! with balanced nutrition facts that keep things in check, you can enjoy a fulfilling meal without that dreaded post-meal slump.
Recipe at a Glance
So here’s the lowdown:
- Total Preparation Time: 15 minutes
- Cooking Time: 15 minutes
- Total Time: 30 minutes
- Serving Size: Makes 4 arepas
- Difficulty Level: Easy
And all for the cost of a few basic ingredients and maybe a splurge on fresh avocado if you’re feeling fancy.
Ah, now that we’ve whetted our appetites, let's get right into the nitty-gritty of what you’ll need to create these delightful arepas catira.
Whether you're planning a cozy family dinner or whipping up a last-minute lunch, the ingredients for this easy arepa recipe are likely already in your pantry, waiting to transform your meal into something special! let’s list them out, shall we?
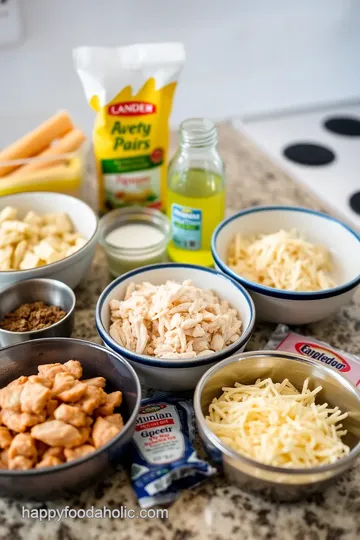
Quality Ingredients Breakdown
When it comes to making Arepa Catira , using the right ingredients is key to achieving that delightful taste. Let’s break it down a bit!
Premium Core Ingredients
-
Pre-cooked corn flour (2 cups): you’ll want to grab a bag of quality corn flour, like p.a.n. or harina pan.
Look for a fine texture—this is what gives your arepas that light and airy inside. i learned the hard way that using regular cornmeal can lead to dense, sad little discs.
-
Warm water (2½ cups): not too hot, not too cold—aim for a warm bath temperature! this helps the flour hydrate nicely.
I once used cold water in a fit of impatience, and the dough turned out crumbly. lesson learned!
-
Salt (1 tsp): Just a pinch of salt helps draw out all those lovely flavors. Opt for kosher or sea salt if it feels fancy, but any salt will do!
-
Vegetable oil (1 tbsp): this is for cooking the arepas. use something neutral like canola or sunflower oil. if you're feeling adventurous, you can also try olive oil for a slightly different flavor.
Selection Tips: Always check the ingredient list—avoid any brands that add preservatives or unnecessary fillers. Freshness matters, get that corn flour from a reliable source.
Storage guidance: keep your flour in a cool, dry place, and tightly sealed to avoid pests. if you have leftovers after making arepas (you won't, trust me), they are best stored in an airtight container and can sit happily in your fridge for about a week.
Signature Seasoning Blend
Now, let’s jazz it up a little!
-
Spice combinations: think about what flavors excite you. a pinch of cumin or paprika can add warmth to your filling.
I love a little smoked paprika in my chicken for that smoky punch.
-
Herb Selections: Fresh cilantro is a classic with arepas. If you’re not a fan, go for parsley or even chives!
-
Flavor Enhancers: Don’t underestimate the power of a squeeze of lime juice over your fillings. It brightens everything up!
-
Aromatic Additions: Fresh garlic is like magic. Mince some in with your protein for richness.
Smart Substitutions
Sometimes life throws curveballs, so here are some handy alternatives:
-
Alternative Options: Can’t find pre-cooked corn flour? You can use masa harina, which works similarly but might require a little more finesse in your dough.
-
Dietary Swaps: If you're avoiding gluten, rest assured these are naturally gluten-free thanks to the corn flour!
-
Emergency Replacements: Out of chicken? No worries! Go for shredded beef or just load up on veggies. Sometimes, I mix in corn or bell peppers for a different spin.
-
Seasonal Variations: In autumn, loading up on roasted butternut squash with cheese is a game changer for those sweeter arepas.
Kitchen Equipment Essentials
Alright, now onto what you'll need in your kitchen to whip up these little gems.
-
Must-Have Tools: A large mixing bowl and a sturdy skillet are a must. You can also use a griddle if you want a little extra something.
-
Recommended Appliances: A food processor makes the mixing easier, especially if you plan to add veggies to the filling. Though, a good ol' wooden spoon does the job too.
-
Helpful Gadgets: A tortilla press can shape your dough quickly, but honestly, I just use my hands. It’s not a perfect science, and that’s part of the fun!
-
Home Alternatives: Don’t have a skillet? Use your oven! Just bake those bad boys on a baking sheet at 375°F for softer arepas.
Pro Ingredient Tips
Here’s where I spill the beans on my culinary wisdom:
-
Selection Secrets: When buying chicken, look for organic or free-range if your budget allows. It makes a world of difference in flavor.
-
Quality Markers: For cheese, go for Queso Fresco that crumbles beautifully, or the stretchy goodness of mozzarella.
-
Storage Solutions: Store leftover cooked arepas in the fridge and just pop them in the toaster or skillet to crisp back up. They are way better than microwaved mushy versions.
-
Money-Saving Tips: Buy larger bags of corn flour—it’s cheaper in bulk! Plus, the more arepas, the merrier. I mean, who doesn't love a quick meal idea that also offers leftovers?
By using quality ingredients and fun alternatives, this journey becomes all about personal touches and flavors that resonate with your taste buds.
And when you’re ready, you can dive headfirst into the instructions for making your Arepa Catira . I promise it’s a delicious adventure!
Recipe Name: Arepa Catira
Essential Preparation Steps
Before diving in, let’s get everything ready for making the perfect Arepa Catira. This is where the French might say “mise en place,” but we’ll keep it simple. Here’s the lowdown:
-
Gather your ingredients: you’ll need 2 cups of pre-cooked corn flour (like p.a.n.), 2½ cups of warm water, salt, and a bit of vegetable oil.
For the filling, grab some shredded chicken, cheese (queso fresco or mozzarella works wonders), and toss in an avocado if you’re feeling fancy! black beans and salsa are great optional extras.
-
Prep techniques: mix the corn flour and salt in a big bowl. when you add water, use your hands! it’s messy but super satisfying.
Gradually mix until it feels right. you want a soft dough—like a well-kneaded pillow.
-
Time Management: Total time for this dish is about 30 minutes, but keep an eye on the clock, especially when cooking the arepas. Multitask by prepping the filling while the dough rests.
-
Organization Tips: Clear your workspace. Stack the ingredients nicely and have bowls ready for the fillings. This will make the process smoother than a perfectly cooked arepa.
Professional Cooking Method
Now, let’s roll up our sleeves and get cooking. Here’s how to make those scrumptious Arepas:
-
Prepare the dough: mix the corn flour and salt, and then, gradually pour in the warm water. use your hands to combine everything until it’s a nice, soft dough.
If it’s too sticky, a smidge more flour can work wonders. once it feels just right, divide it into four balls and flatten them to about ¾ inch thick.
-
Cook the arepas: heat a skillet over medium-high heat. drizzle in some vegetable oil. it should sizzle when you add the arepas.
Cook each one for around 5-7 minutes on each side until they are golden and crispy. want to bake instead? preheat your oven to 375°f (190°c) and bake for about 10-15 minutes.
It’s a softer option, and i sometimes go this route for a change.
-
Prepare the Filling: In a separate bowl, toss your shredded chicken with half of the cheese. This mix is where all the flavor begins, so don’t skimp on the chicken or cheese!
-
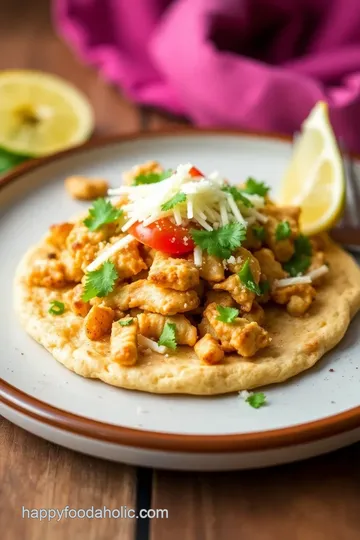
Assemble the arepa catira: once the arepas are beautifully golden brown, slice them open—almost like a pocket. stuff those bad boys with your chicken and cheese goodness.
Add avocado slices, black beans, and a spoonful of salsa for that extra zing.
-
Serve: voilà! serve warm with salsa or pico de gallo on the side. you might want to add a glass of fresh juice or a decadent venezuelan-style margarita to wash it all down.
Expert Techniques
Let’s talk about those finer points—what truly elevates your cooking game.
-
Professional methods: rest your dough for about 5-10 minutes after mixing. it really helps with texture. oh, and while cooking, don’t flip your arepas too soon; wait until you’ve established that lovely crust.
-
Critical Steps: Always check that your skillet is hot enough before introducing your arepas. A properly heated skillet = no sticking.
-
Precision Points: For arepas, a nice golden crust is your success indicator. If they browny too fast, lower the heat. It’s all about finding that perfect balance.
-
Quality Checks: Smell is a fantastic indicator. When they start to smell delicious, they’re almost done!
Success Strategies
Every cook faces hiccups. Here’s how to smooth out any bumps in your cooking journey.
-
Troubleshooting Tips: If your dough feels too dry, a splash more water can fix the issue. Conversely, if it's too wet, sprinkle in more flour.
-
Quality Assurance: Taste check as you go! The flavor should be fantastic, whether it’s chicken or cheese filling.
-
Perfect Results Guide: Always aim for that crunch when you cut through the outside. If it sounds hollow, you’re in business!
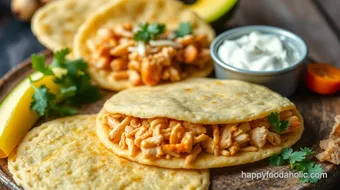
These arepas catira are not just a quick meal; they bring a slice of venezuelan culture to your kitchen. they’ve got something for everyone, so feel free to experiment with your own favorite fillings or variations.
And don't worry if you mess up the first time. i burnt my first batch and ended up serving them like croutons over a salad—delicious in a totally unexpected way!
Stay tuned for some additional tips, serving suggestions, and variations. Cooking should be fun and adventurous, so let’s keep it rolling!
Success Guaranteed Tips
When it comes to cooking arepas , success doesn’t just happen; it’s often built on tips and a little bit of know-how acquired through years of trial and error in my own kitchen.
If you want to master this dish, think of it like a rite of passage into the wonderful world of venezuelan food .
You might start with professional insights from chefs, but expert techniques can come from simple home cooks like myself. for instance, i’ve learned that patience is key when forming the dough.
Also, don’t rush the cooking process. let those golden crusts form, and the aroma will remind you of the streets of caracas.
Just remember, every kitchen mishap is a chance to learn!
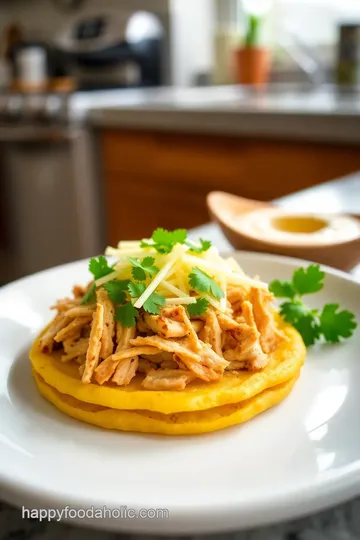
Perfect Presentation
Now, once you've got your arepa catira stuffed with its glorious fillings, it’s time to think about presentation. don’t just slap them on a plate; let’s make them beautiful! try using simple plating techniques like stacking them slightly askew to create visual interest.
When it comes to garnish, fresh cilantro or a squeeze of lime can brighten everything up. serving suggestions? pair them with a side of black beans for that hearty feel or a fresh salsa that just dances on your taste buds.
Trust me, a colorful dish beckons people to dig in!
Storage and Make-Ahead
Okay, so perhaps you’ve made a bit too much of that cornmeal dough. no problem! understanding proper storage is crucial.
Always keep your cooked arepas in an airtight container to maintain freshness. they can last up to three days in the fridge! planning to enjoy them later? just reheat them in a skillet on low heat until they’re warmed through again—because who doesn't love that crispy exterior the second time around? and don’t fret if they seem a tad dry; a touch of oil on the pan can work wonders.
Creative Variations
Getting creative with fillings can elevate your arepa game a gear or two. sure, traditional chicken and cheese are classics, but how about trying a seasonal twist? in the fall, i love adding roasted butternut squash or some caramelized onions to bring in the autumn vibes.
Or what if you lean into dietary modifications? use gluten-free arepas instead by sourcing the right corn flour. you might even incorporate the fun regional variations with spicy chorizo or fresh avocados—get experimental! there’s no wrong way to fill an arepa .
Complete Nutrition Guide
People seem to think that just because we’re indulging in a delicious arepa , it has to be guilty pleasure food.
Well, hold on! each serving packs a punch of nutritious goodness . with about 350 calories in one, you get a healthy mix of protein, fiber, and healthy fats, plus the perks of loaded vegetables if you stuff 'er up right.
If you want portion guidance, i always say one filled arepa is a perfect meal, especially if you’ve got a warming side like sweet plantains.
Remember, balance is key in making it just as nutritious as it is delicious.
Expert FAQ Solutions
Having questions is normal, especially when diving into unfamiliar territory like making homemade arepas. if you’re anxious about dough consistency, remember—less is more.
Too much water will make them sticky, while too little will result in crumbling disks. in the troubleshooting department, if your arepas aren’t holding their shape, try a bit more flour next time.
The beauty of cooking lies in these little lessons. and believe me, the more you make them, the less pressure you’ll feel; you'll be flipping them like a pro before you know it!
In conclusion, cooking arepas is not just about following a recipe; it’s about creating an experience infused with love and history.
From mastering success tips to indulging in endless variations, have fun with it! whether you’re sharing a meal with family or inviting friends over for a casual bite, these delightful corn cakes can be the star of any gathering.
So roll up your sleeves, grab that pre-cooked corn flour , and let’s get cooking!
Arepa Catira Card
⚖️ Ingredients:
- 2 cups pre-cooked corn flour (such as P.A.N.)
- 2½ cups warm water
- 1 tsp salt
- 1 tbsp vegetable oil (for cooking)
- 1 cup cooked shredded chicken (or your preferred protein)
- 1 cup shredded cheese (Queso Fresco or mozzarella)
- 1 medium avocado, sliced (optional)
- ½ cup cooked black beans (optional)
- ½ cup salsa or pico de gallo (optional)
🥄 Instructions:
- Step 1: In a large mixing bowl, combine the pre-cooked corn flour and salt. Gradually add the warm water while mixing with your hands until a soft, pliable dough forms.
- Step 2: Divide the dough into 4 equal portions and shape each portion into a ball. Flatten each ball into a disc about ¾ inch thick.
- Step 3: Heat a skillet or griddle over medium-high heat and add the vegetable oil.
- Step 4: Once the oil is hot, place the formed arepas on the skillet. Cook for about 5-7 minutes on each side or until a golden crust forms.
- Step 5: In a bowl, mix the cooked shredded chicken with half of the shredded cheese until combined.
- Step 6: Once the arepas are cooked, slice them open horizontally, not all the way through—like a pocket.
- Step 7: Stuff each arepa generously with the chicken and cheese mixture. Top with avocado, black beans, and salsa if desired.
- Step 8: Sprinkle the remaining cheese over the filled arepas.
- Step 9: Serve the arepas warm with additional salsa or pico de gallo on the side.
Previous Recipe: The Club Long Island Iced Tea: 5 Irresistible Tips for a Refreshing Twist
Next Recipe: Early Return CSA: 5 Quick Tips for a Flavorful Vegetable Stir-Fry